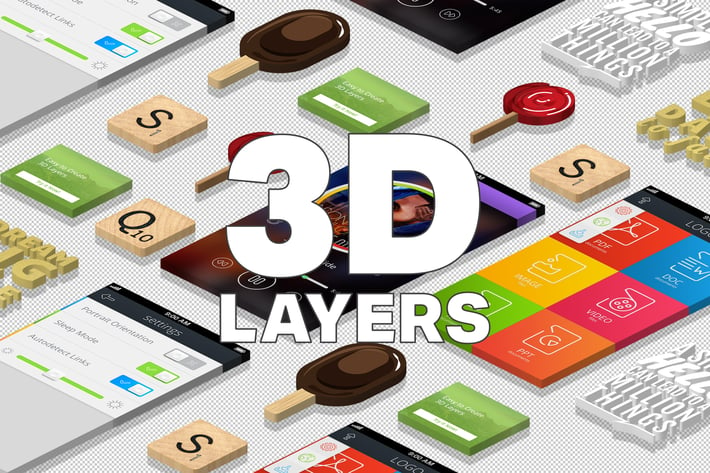
3D Isometric Layers
Author
sparklestock
Published
Jan 11, 2021
Item Code
b71a0702-9dcf-4eb7-a4ae-84e8beea7246
How to Download
- 1 Copy the Item Code above
- 2 Go to fuckdcma.com
- 3 Paste the code in the text box and click "Generate Download Link"
About This Item
A more presentable way to display your layers! 3D Layers gives you the power to turn your layers into 3D extrusions with just one click.
Easy to Use
Simply select a layer and play one action to create an extrusion. From there on, you can extend/shorten the extrusion, rotate the angle, add highlights/outlines, etc using actions.
Editable Layers
Need to make a change? All layers are fully editable so that you can make the changes without undoing a bunch of steps. Simply play the “Edit Extrusion Layer Contents” action, make your changes, then play the “Save Extrusion Layer Contents” action.
Smooth Edges
Isometric transformations can cause jagged edges. These actions apply smart smoothing to eliminate jagged edges. You can also switch between crisp, smooth, or ultra smooth edges.
Full Transparency Support
Layers will always look great because they support transparency perfectly. No additional steps are required.
Batch Mode
Turning one layer into a 3D extrusion is easy. What if you need to do it to all your layers? Simply use the step-by-step batch mode to speed up your process.
Photoshop Actions
Top Left – Create Extrusions from All Layers (Step 1)
Top Left – Create Extrusions from All Layers (Step 2)
Top Left – Create Extrusions from All Layers (Step 3)
Top Left – Create Extrusion from Current Layer
Top Left – Increase Extrusion 10px
Top Left – Increase Extrusion 20px
Top Left – Increase Extrusion 40px
Top Left – Increase Extrusion 80px
Top Left – Increase Extrusion 160px
Top Left – Decrease Extrusion 10px
Top Left – Decrease Extrusion 20px
Top Left – Decrease Extrusion 40px
Top Left – Decrease Extrusion 80px
Top Left – Decrease Extrusion 160px
Top Right – Create Extrusions from All Layers (Step 1)
Top Right – Create Extrusions from All Layers (Step 2)
Top Right – Create Extrusions from All Layers (Step 3)
Top Right – Create Extrusion from Current Layer
Top Right – Increase Extrusion 10px
Top Right – Increase Extrusion 20px
Top Right – Increase Extrusion 40px
Top Right – Increase Extrusion 80px
Top Right – Increase Extrusion 160px
Top Right – Decrease Extrusion 10px
Top Right – Decrease Extrusion 20px
Top Right – Decrease Extrusion 40px
Top Right – Decrease Extrusion 80px
Top Right – Decrease Extrusion 160px
Left – Create Extrusions from All Layers (Step 1)
Left – Create Extrusions from All Layers (Step 2)
Left – Create Extrusions from All Layers (Step 3)
Left – Create Extrusion from Current Layer
Left – Increase Extrusion 10px
Left – Increase Extrusion 20px
Left – Increase Extrusion 40px
Left – Increase Extrusion 80px
Left – Increase Extrusion 160px
Left – Decrease Extrusion 10px
Left – Decrease Extrusion 20px
Left – Decrease Extrusion 40px
Left – Decrease Extrusion 80px
Left – Decrease Extrusion 160px
Right – Create Extrusions from All Layers (Step 1)
Right – Create Extrusions from All Layers (Step 2)
Right – Create Extrusions from All Layers (Step 3)
Right – Create Extrusion from Current Layer
Right – Increase Extrusion 10px
Right – Increase Extrusion 20px
Right – Increase Extrusion 40px
Right – Increase Extrusion 80px
Right – Increase Extrusion 160px
Right – Decrease Extrusion 10px
Right – Decrease Extrusion 20px
Right – Decrease Extrusion 40px
Right – Decrease Extrusion 80px
Right – Decrease Extrusion 160px
Reveal Canvas
Generate Backgrounds
Edit Extrusion Layer Contents
Save Extrusion Layer Contents
Hide Extrusion
Show Extrusion
Separate Shadows from Extrusion
Edge Smoothness – Crisp
Edge Smoothness – Smooth
Edge Smoothness – Ultra Smooth
More from sparklestock
View all →
20 Creamy Lightroom Presets and LUTs
by sparklestock

20 Light Rose Lightroom Presets and LUTs
by sparklestock

20 Magic Hour Lightroom Presets and LUTs
by sparklestock

20 Moody Brown Lightroom Presets and LUTs
by sparklestock

20 Uncharted Lightroom Presets and LUTs
by sparklestock

20 Tidal Tones Lightroom Presets and LUTs
by sparklestock

20 Nostalgic Glow Lightroom Presets and LUTs
by sparklestock

20 Kindred Lightroom Presets and LUTs
by sparklestock
You May Also Like
Energy Animation Photoshop Action
by sreda
Oil Paint Animation Photoshop Action
by sreda

Feathers Photoshop Action
by IndWorks
80's Retro Poster Photoshop Action
by IndWorks
Acrylic Photoshop Action
by Eugene-design

Glitch effect with GIF animation 2
by Kahuna_Design
Pen and Wash: Instant Ink Effects for Illustrator
by JRChild

Drama Photoshop Actions
by Artmonk